Showing posts with label Vintage Style. Show all posts

Friday, March 1, 2013

Buffet Before and After

 As promised: the before and after photos of my infamous buffet project.

When I first saw it at Goodwill this past October, I initially walked out and left it. Then about an hour later, when I still could not get it out of my head, I called my mom, who happened to be in town, and asked her to go pay for it and I picked it up the next day and paid her back.

You just don't see these anymore. This is the first one I'd seen up close; other than that I'd only seen them in magazines.

I bought it to re-do and sell; but later, it got designated as the candy buffet for my sister's wedding. It wasn't till after Christmas that I got started on the prep work.


(We turned it over so the legs were easier to sand. The project took over my dining room, because it was too cold to work outside.)


The tools I can't do without: clamps, razor blade, scrapers, mini screw driver, tooth picks for getting in little places, a paper mask so I don't inhale all that nasty dust, Elmer's glue and wood filler, gorilla glue, sanding blocks (I love these!) and my new electric sander for large areas of sanding. Also, my shop vac, and a steam iron.....


 At first I tried to glue the loose veneer back down. It wasn't working real good, so I decided to just rip it all off. I had seen somewhere on line that you can remove veneer with a steam iron, so I decided to give it a try. I wetted a towel and placed it over the work area for about 5 minutes, then I went at slowly applying the steam iron over the area, which loosens the glue and then you can rip it off. Tougher spots needed more time with the iron, and I had to scrape it inch by inch. But by golly, I got it all off. And then I took the next layer off, as well. I will not dink around with gluing veneer down ever again.

 The doors, before (left) and after sanding (right). The whole buffet had been covered in a really crappy coat of crappy brown paint. Eww.

 This was the "let's try to glue it back down" phase.

 The cats absolutely loved it.
 Finally, I had the sanding complete and we got a warm is day (in the 60s) so we could paint it. Good thing we did because that was the last nice day we had to do it outdoors before my sister got married.
Kevin used the paint sprayer, of course. I swear by that thing. However, I did have to touch up the legs quite a bit because of weird dripping patterns because of the way we had it laying down on it's back. We used Glidden "Parchment White" in flat. Once it was dry I distressed it on the corners and edges, which you can't really see here. I also put all new glass knobs on it, bought at Hobby Lobby.


                                                As a candy buffet at my sister's reception.

I was going to glaze it, but I haven't done it yet. I had bought a glaze and it was too dark. I haven't even done any polycrylic or anything on it yet. I am still contemplating a glaze.

I am really happy about how it turned out. I kind of wish I was able to keep it, because I will likely never find another one like it. But it is just too large for my house, and besides, I already have an antique oak dining set so this doesn't fit in my decor. So, it is (reluctantly) for sale.

I've put ads out on Craigslist for it, but if it doesn't sell on there, I will send it to someone's antique shop and consign it. I simply cannot store this monster in my office/den/studio forever. :)

Tuesday, February 26, 2013

A Vintage, DIY Wedding

I am flat - out exhausted, physically and emotionally.

My sister got married this weekend, and it was a DIY wedding.... and we DIY'd all of it - except the cake. Someone else did that.

First of all, the lovely bride:


I bought these brown paper bags on eBay and Mom found the stamps. These were for the candy favors. They will be for sale in my Etsy shop soon, because we made waaaaay too many.

 A little before of the reception hall: the flourecent lights were covered with tulle and Christmas lights. My sister wanted a soft candlelight look. Right here I have to say: While my sister, my mom an d I hatched all the ideas amongst ourselves and were heavily inspired by Pinterest, the work was carried out by our friend Faith Freeman and her daughters Joanna and Alice. Mom and I lent our help mostly in the evenings; but the bulk of what was done took two and a half days and was done almost exclusively by these lovely ladies. And my husband, who did the heavy lifting and moving, and was go-fer boy. :)

 Aaaaand my buffet. Purchased at Goodwill in really awful condition. I've been sanding and stripping and painting and babying this thing since Christmas.... I'll do a detailed before and after soon.

 Of course, with a sister that sells burlap bunting banners for a part time gig, she wanted to use banners in her decor. We also made burlap table runners.

She came to my house and said "I like this, and that, and that, and also this", and pointed to everything she wanted in the wedding, and we packed it up and used it. Including the tree slices. We had fallen a large dying tree in the yard and so we used slices of the branches as pie and food stands. Almost everything used as decor for the wedding was mine... she wanted to use vintage things instead of lots of flower arrangements.

Doors was one of the first things my sister decided she wanted for the wedding. We had some doors, of course, but our friend Daniel works on a construction crew in Northern VA that removes asbestos from old historic buildings and remodels them; so he had access to all the doors we wanted. He drought down a load, and he and my husband put several sets together.

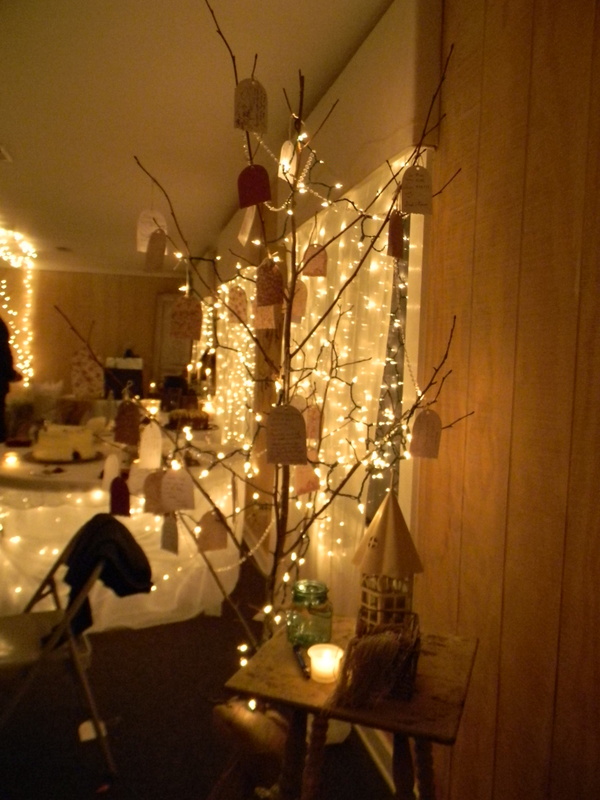
My husband also made the trees, which was my idea .... that I almost regretted because it was one of the most difficult things we did. We screwed pieces of wood to the bottoms of carefully sculpted tree branches and placed them in burlap bags filled with gravel. Mrs. Freeman and her team strung them with lights. 

  One of the trees was designated as a "Wish Tree"... also my idea. (I got the inspiration from a smaller wish tree thing I saw on Pinterest. But ours was bigger.) Instead of a guest book, people wrote a message on a tag and tied it to the branches. Later, we removed the cards and put them in a pretty box for her to look at later.  The small stable next to the tree is something from my house as well...


Several tables had lights underneath, so the appeared to glow.  It was awesome.


We used doors in the corners, to give the rather hum drum room the feeling that it was a older space.

 My old suitcases were made into a gift card box.... the photo is of my great grandmother Sophie Rose Kelly, whom my sister is named for. The mini banner is one I sell in my shop.


 Years ago I had bought hundreds of white hankys at an auction - and never did anything with them. Mrs. Freeman draped them over the backs of the chairs and taped them in place - it was a genius plan!


This set of doors blocked the closet door and the tree behind it was just an awesome touch as well. It covered up the fire extinguisher. :)


 The cake table.... and banners from my shop. Every window in the place had Christmas lights in them, and the effect was AMAZING.


 The candy buffet..... the glass candy jars are from my friend Sally, with the antique shop. I have wanted to do a candy buffet for years and finally did it!!!

I don't think I have enough sisters to have weddings for me to do ALL the ideas I have. I guess if I wanted to act on all my wedding ideas, I'd have to become a wedding decorator.


I have about 100 gallon size pickle jars in an old barn on our farm. We cleaned some of them up and put sand in the bottom, and a candle, and put them all over the back deck ovelooking the lake, and lined both sides of the sidewalk leading into the building. It was fantastic.


Here is what the Wish Tree looked like at the end of the evening.


Ok that's a lot of photos, so I'll quit now and show photos of our vintage inspired dresses another time.

It was the best wedding ever, even if I do say so myself, and I LOVE using vintage stuff instead of a zillion flower arrangements!! The only roses we used were in her bouquet, (which I made) and the corsages. All the other flowers she wanted was baby's breath. Which we did use tons of.

Vintage, DIY weddings for the win!!

Friday, February 15, 2013

Embellished Clutch Handbags

I had a small stash of plain ol' clutch handbags sitting around doing nothing so I decided to embellish them after I taught myself how to stitch these roses onto t hings. Old stuff gets a facelift!


I started out with vintage cotton rag strips that I tea dyed. Then I used some kind of sheer material in my scrap box that was harder to work with because it was slippery; but once I figured out the trick of it it was a snap. I even figured out how to make little leaves.
To the cotton roses I added beads from a broken vintage necklace, pearl buttons, and other little findings.

1. Black velvet clutch
2. White beaded clutch
3. Crochet envelope clutch
4. Black jersey clutch

Tuesday, January 1, 2013

Happy New Year! Shop Update: Purses

I have been trying *not* to reflect much on 2012, for reasons of my own. Much of the year was spent on a daily emotional roller coaster with my personal life and my work life entwined in a jumbled up wreck that only ended in misery and death... the effects of which I still am reeling from, in many ways. 2012 will always be a year to try and not remember.

But anyway.

I added new purses to the shop today; some from my own collection; which I am cutting back on with great reluctance.


1. Black wool 1960s handbag - really classy.
2. Lipstick red 1960s boxy purse
3. Navy blue faux leather boxy purse, really unusual shape-60s
4. Hand embroidered white linen Bermuda handbag with wood handles 60s


Friday, December 28, 2012

Shop Update: Vintage and Vintage Inspired


1. 50s Chunky turquoise colored bead necklace
2. Antique, Victorian glass faceted button (shoe button?) earrings with bows
3. Vintage assemblage: key necklace with pearl bead charm 
4. Vintage assemblage: Cameo and skeleton key necklace 
5. 50s faux pearl 2 strand ncklace
6. Vintage assemblage: 20s-30s black lace applique with glass faceted button charm (Available 12/29)
7. MOP bangles, set of three

I am really excited about the up coming new year; especially when it comes to growing my little business of selling old stuff.
In 2012 my shop grew beyond what I ever expected - it definately out grew "hobby" status as far as the IRS is concerned. And I am excited to see it grow even more in 2013!

In the coming weeks I'll be changing my shop's name, and URL. I'll be operating as plain "Carolina Vintage"  in 2013.

I'm also going to be using a new photo studio space in my friend's closed antique shop.

I'm also consigning items for people now; mostly some high end furs and coats; coming in 2013. 

For now my burlap banners are still residing in my main Etsy shop but I have been contemplating giving them a shop of their own and adding more wedding decor items to it as well; we'll see what happens. I don't know if I can run three shops all at once with any success. In the meantime, check out  the banners; they all ship FREE worldwide! They were a huge hit for the 2012 Christmas season.

I am also hoping to travel around to more craft fairs/antique shows/flea markets in the Spring and Summer; I enjoy interacting with customers in person.

Thanks for reading my blarney and nonsense this past year, lovely readers! See you all in 2013, with a pile of new inventory!

Saturday, December 22, 2012

It's Beginning to Look a Lot Like Christmas


My Christmas decor is like everything else in my house: simple, natural, and vintage. I keep Christmas decorating in the back of my mind all year as I visit thrift stores and yard sales and antiques shops. That's where my little primitive Santa and Father Christmas collection started this past year. I adore those primitive figurines.

I also like to use things I already own and incorporate them into my Holiday decor, especially vessels like old silver, cast iron, wood boxes, jars, etc. etc.

I always start with a trip into the woods for any and all kinds of natural things. My driftwood fits into the nature category; I picked that up while we were vacationing on the North Carolina Outer Banks this past summer. I only which I'd picked up more of it! I made my own two front door wreaths and went with simple gold bows instead of my usual red.

I'm loving a stripped down, neutral and natural look this year, too. I usually like red; and I used a lot of red and gold on our tree (which I haven't pictured yet) but in my office/studio my theme was green and white, and I used things from my bird collecting - figurines and nests and such.

On my newly re finished stair case, I went with fir boughs instead of my usual hand-crafted garland, because I didn't feel like covering it up so completely. And I used my big red and gold bows there. :)

Things that really inspired me this Christmas:

Primitive Santas
Vintage bottle brush trees
Deer
Birds
Vintage mittens (Not shown here)
Vintage greeting cards (Shown in the wood box in the photos above)
Vintage flower frogs (stick some of the greeting cards in them)
Vintage wood boxes
Vintage "Shiny Brite" glass ornaments. (I have tons, but I'm afraid to get them all out and use them!)

 As well as:
Twigs, moss, feathers, tree slices,evergreen branches, pine cones, berries, rosemary sprigs, boxwood, ivy, holly, driftwood, magnolia, rocks, odd pieces of wood, and fruit - which are all pretty much free.

What inspires your Christmas decor?