Friday, December 28, 2012

Shop Update: Vintage and Vintage Inspired


1. 50s Chunky turquoise colored bead necklace
2. Antique, Victorian glass faceted button (shoe button?) earrings with bows
3. Vintage assemblage: key necklace with pearl bead charm 
4. Vintage assemblage: Cameo and skeleton key necklace 
5. 50s faux pearl 2 strand ncklace
6. Vintage assemblage: 20s-30s black lace applique with glass faceted button charm (Available 12/29)
7. MOP bangles, set of three

I am really excited about the up coming new year; especially when it comes to growing my little business of selling old stuff.
In 2012 my shop grew beyond what I ever expected - it definately out grew "hobby" status as far as the IRS is concerned. And I am excited to see it grow even more in 2013!

In the coming weeks I'll be changing my shop's name, and URL. I'll be operating as plain "Carolina Vintage"  in 2013.

I'm also going to be using a new photo studio space in my friend's closed antique shop.

I'm also consigning items for people now; mostly some high end furs and coats; coming in 2013. 

For now my burlap banners are still residing in my main Etsy shop but I have been contemplating giving them a shop of their own and adding more wedding decor items to it as well; we'll see what happens. I don't know if I can run three shops all at once with any success. In the meantime, check out  the banners; they all ship FREE worldwide! They were a huge hit for the 2012 Christmas season.

I am also hoping to travel around to more craft fairs/antique shows/flea markets in the Spring and Summer; I enjoy interacting with customers in person.

Thanks for reading my blarney and nonsense this past year, lovely readers! See you all in 2013, with a pile of new inventory!

Saturday, December 22, 2012

It's Beginning to Look a Lot Like Christmas


My Christmas decor is like everything else in my house: simple, natural, and vintage. I keep Christmas decorating in the back of my mind all year as I visit thrift stores and yard sales and antiques shops. That's where my little primitive Santa and Father Christmas collection started this past year. I adore those primitive figurines.

I also like to use things I already own and incorporate them into my Holiday decor, especially vessels like old silver, cast iron, wood boxes, jars, etc. etc.

I always start with a trip into the woods for any and all kinds of natural things. My driftwood fits into the nature category; I picked that up while we were vacationing on the North Carolina Outer Banks this past summer. I only which I'd picked up more of it! I made my own two front door wreaths and went with simple gold bows instead of my usual red.

I'm loving a stripped down, neutral and natural look this year, too. I usually like red; and I used a lot of red and gold on our tree (which I haven't pictured yet) but in my office/studio my theme was green and white, and I used things from my bird collecting - figurines and nests and such.

On my newly re finished stair case, I went with fir boughs instead of my usual hand-crafted garland, because I didn't feel like covering it up so completely. And I used my big red and gold bows there. :)

Things that really inspired me this Christmas:

Primitive Santas
Vintage bottle brush trees
Deer
Birds
Vintage mittens (Not shown here)
Vintage greeting cards (Shown in the wood box in the photos above)
Vintage flower frogs (stick some of the greeting cards in them)
Vintage wood boxes
Vintage "Shiny Brite" glass ornaments. (I have tons, but I'm afraid to get them all out and use them!)

 As well as:
Twigs, moss, feathers, tree slices,evergreen branches, pine cones, berries, rosemary sprigs, boxwood, ivy, holly, driftwood, magnolia, rocks, odd pieces of wood, and fruit - which are all pretty much free.

What inspires your Christmas decor?


Tuesday, December 11, 2012

Finally. Staircase Makeover Before and After


Warning: lots of photos in this post!

This project took me all.summer.

It originally started off as "just stripping the paint off the newel post and the steps and add a little white paint and brighten up the foyer". But like everything else in the house, I got started and realized it wasn't going to be as simple as one weekend of "let's take the paint off he newel post and the steps and add a a little white paint", oh noooooo. As I got deeper and deeper into it, it became painfully clear just how much work this was going to take to get the job done right.

At the time, my work schedule went haywire and I had very little free time at home to do projects. And Kevin was constantly on the road working and hardly ever home, either.

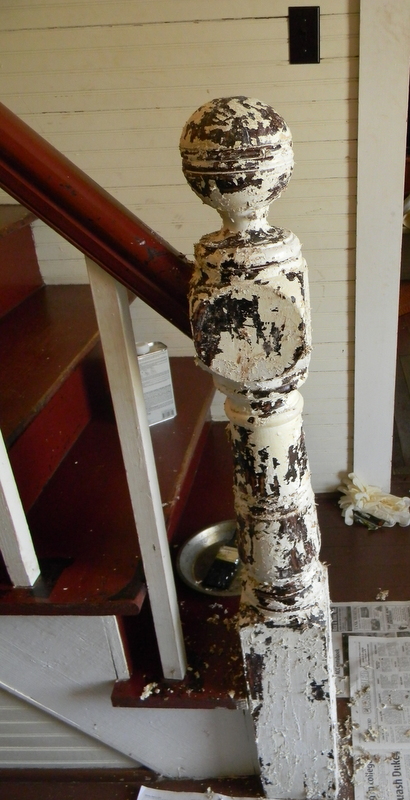
So almost all my free time  - including many very late nights - was spent stripping layer after layer of paint off. I was using a toothpick to remove some of the paint. A visitor  to my house during the stair case re-do would would find me hunched over the stairs or the railing with my face about two inches away, sanding away.

A few weeks into the project, I started having horrible eye pain. It got worse, and wasn't going away, so I ended up having an emergency visit to the eye doctor, where it was determined that I had some kind of infection in my eye - most likely from the contaminated dust stirred up from the sanding. After all, much of the old paint was lead. I had several prescriptions given to me, and it cleared it up - but from then on forward I wore eye protection and a face mask.

 (I know, I know, you're thinking what on earth that rug is doing covered in scrapings and sandings! But t his rug was ruined already by my dog, and I kind of just used it to catch all the stuff. Then it got banished.)

 (With the paint all gone)


Then the stair project spilled over on the the floor, and we decided to strip the whole foyer down to the original black pine flooring from the 20s. There were about three layers of gross brown paint on top of it. I spent weeks and weeks on my knees and every spare moment I could get.


Of course once the stripping and sanding was all complete, the walls all needed re painting, and the trim... and the exposed wood needed touching up with stain to even out the tone... meanwhile, fall is setting in, and colder weather. And my work schedule is still ..... complicated .... at this point. Even more complicated than before.

But finally, it was done. It's not perfect - and that's OK. We're going for lived in cozy farmhouse, not perfect. We're not shellacking anything either - we might wax, but we don't want high gloss. High gloss and farmhouse just don't work well together, in my opinion.
I still have to strip door frames and re paint doors but that is for next year's warm season.... when I can open all the doors and windows for ventilation so I don't get another eye infection. That, and I am just plain worn out from months and months of this remodeling work. I feel like even though I worked for months, we've still barely scratched the surface of the volume of what has to be done to this house before it's done-done.

For the past year or so, I've been buying framed vintage prints in a similar color scheme and collecting them in my stash. By summer's end, I had enough of them to complete the look for my newly re finished stair case wall.


 Thank you, Pinterest - the idea of cutting paper to the exact size of the prints and arranging them on the wall before putting holes everywhere is genius. 


(The stairs and floor turned out to be a rich walnut color, which we love. I didn't want light floors.)

You'll notice, in this photo,  that some white paint remains in the cracks of the newel post. I gave up on it. I was scraping it out with a toothpick hour after hour and it just got old.

You can't really tell here, but there is faded painted stencil lettering on the bottom of the newel post, from the lumber yard in South Boston where this must have been purchased back in the 20s.I left that, too. I find it super cool.


 *huge sigh*

I'm so glad I got it done before Christmas. Now I get to festoon the railing with real pine/cedar garland and bows...


Saturday, December 8, 2012

Vintage Writing Desk - Before and After


I got this from my mom at the same time I got my black dresser, back in the summer. She bought it on purpose, for me to re-do.

It's 1960s era, Early American style, nice solid wood but with messed up maple veneer in spots. It has taken me months of hit and miss gluing down of layer after layer of veneer that could be saved, and removal of veneer that couldn't.

The weather has been fantastic and warm, so I finally had a chance to get it painted this week, along with several other projects!

I had almost done it in  a paler shade of green but then I changed my mind and went with this vintagey green which actually looks like a 1970s avocado green in these pictures, but I promise it's not.

I don't know what on earth my  mom is going to do with it; she already has one cute vintage writing desk similar to this in storage. But, it's cute anyway, and who knows, she might just sell it or something.

What a great week this has been for painting projects! (I did finally get my hubby's bedside table done as well, very similar to mine from the last post.)

What on earth will I get done next week?! Who knows! I'm really on a roll!

Tuesday, December 4, 2012

Grey Areas

My bedside table was.... gross.


I inherited this from my Mom, I think.  I must have, because I don't recall buying it, and I certainly didn't steal it, so I think it was a Mom hand me down. Cute, but reaaaaaaaaly beat up.

 With the paint on, but not distressed yet.


 Phileppe says "Nice table, Mom!"


Man, I have been on a roll with my projects this past week! It's amazing what I can get done when I have the work schedule of a normal person - or no work schedule at all. HAha.

So, I had been pondering what color to do my bedside table in, since I am re-decorating our bedroom. We have the black Federal style dresser in there, and my (new) antique iron bed is also black. So I didn't want to do more dark colors. Nor did I want white. Or cream. I thought about green, but it just didn't go with my "neutral" vibe. I wanted something I could use in another room later if I want. But something that went in our bedroom decor now. I needed something in between "plain white" and "loud primary color" so..... a soft grey seemed like a good choice.

I mixed my own color, too: with paints leftover from other projects. Black from the dresser and "white sage" from the corner cabinet. I got a soft, chalky grey.

To get the aged appearance here, I first watered the paint down. And it's FLAT paint. I prefer to use flat paints for furniture re-dos; it distresses so much better and doesn't look "peely" like latex or even eggshell can.
Anyway, so I added a bit of water to my mixed up paint, to thin it a bit for not-so-thick coverage. Worked like a charm. The varnish underneath showed through in spots and looked perfectly aged.

Once it was dry, I went at it with sandpaper very lightly on the furthermost edges. Then I gave it a once over with poly.

Ta-da.

I love it; it's kind of "Frenchy" or Parisian looking.

Philippe loves it, too. Philippe is also kind of "Frenchy" and Parisian, come to think of it. How apropos. :)

I am also re-doing HIS bedside table but had to quit in the middle because the ikky old varnish was bleeding through the water based Killz, so it's off to Home Depot for something stronger to prime it with. Grrrrrr.

This step brings me all the closer to getting the bedroom done and doing a big reveal for you guys! Yay. 

Monday, December 3, 2012

Burlap Bunting Banners For Christmas!


This past October (ish) I made some sample burlap banners and put them in my shop. They quickly sold, and the requests poured in, and I have been making and selling large numbers of them ever since. Most evenings find me at a make shift craft table in my living room, cutting, painting, sewing and packing up the banners.
I had no idea burlap was such a huge trend this year; this was something I originally did for my own decor, and added to my shop as a "test".
Well the test turned out great and I have done photo prop banners, custom banners, wedding banners, nursery decor banners.... any and all kinds of banners.

You can view the banners in my shop by clicking here. 

If burlap sales keep up after Christmas, I'm going to have to think about opening  a third shop on Etsy just for the banners - and some other  burlap items I have started doing samples of. :)